| A CARD HOLDER FROM SCRAP CARDBOARD BOXES |
These are full instructions for making a rack or holder, e.g. for charity cards, from used corrugated cardboard boxes.
Introduction
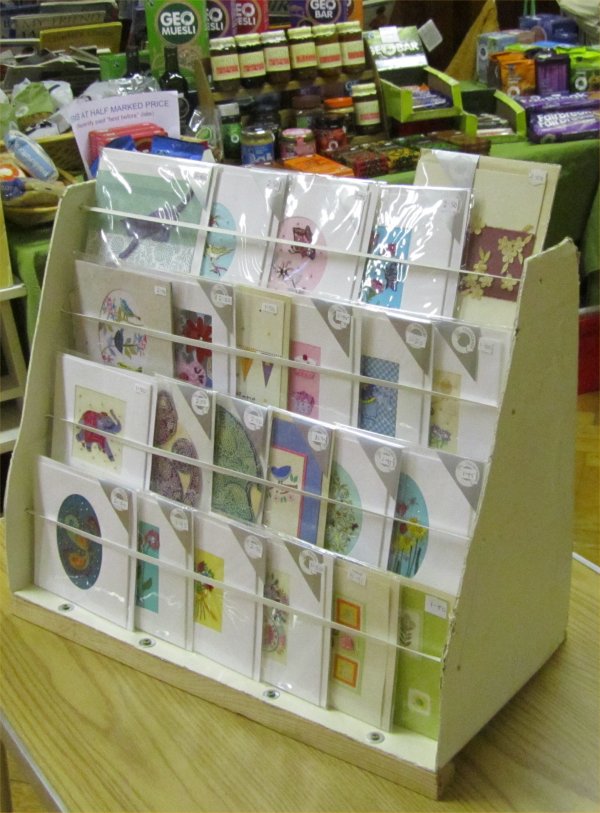
The photographs show the prototype holder, which is part of the Traidcraft stall at St Aidan's URC, Hexham. Elisabeth has run the stall for the past six years, with Tony as 'heavy' and IT manager. It operates after morning service at St Aidan's most Sundays throughout the year, also at the Hexham Debates on justice, peace and democracy issues; these take place at St Mary's Roman Catholic Church, just over the road from St Aidan's on six Saturdays each year, usually from January to July.
Traidcraft® printed and handmade cards are very popular with both sets of customers, and we felt the need to make more space for them on the stall. So Tony set to work and has so far made four, two for the stall and two for the church.
|
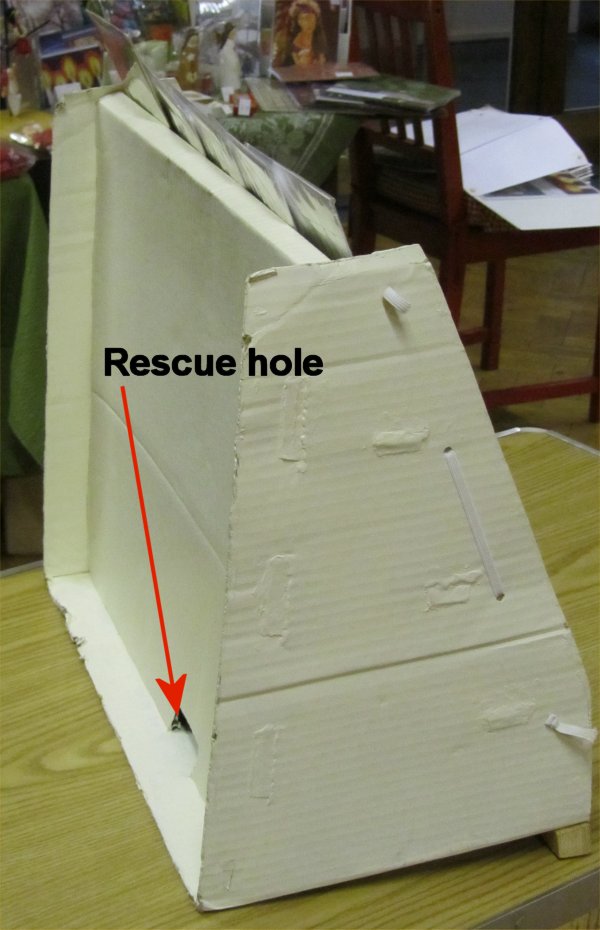
Tony's instructions: Cards can be placed on the base and all three shelves. The ‘rescue hole’ at the back makes it much easier to retrieve e.g. pencils which may fall down inside. Note – the prototype has a strip of wood under the front to tilt it back slightly (otherwise the cards sometimes fell forwards). The instructions below include a cardboard support, but if preferred this could be removed and wood used instead. |
|
|
|
Items required:
| Two large corrugated cardboard boxes. When opened out such that folds are only crossways, not lengthways, their minimum dimensions must be: | ||
| For front and back: 100 x 56 cm For base and sides: 135 x 35 cm | ||
| Sticky tape or masking tape Ruler – ideally metre-length but a foot rule or a tape measure can be used satisfactorily Guillotine or scissors for cutting paper Large quantity of drawing pins Craft knife Scalpel or small sharp pen-knife Blunt knife (yes – really!) Medium thickness felt pen Glue e.g. craft or wood glue Large sheets of polythene e.g. large bin liners | ||
General points:
| * Box cardboard is intended for single-use cardboard boxes, not precision engineering, so you may find things don’t work out exactly right. However, corrugated cardboard is also extremely repairable, so keep all offcuts till you’ve finished! * The instructions show the way I make these. There’s plenty of scope for originality and customization. |
PDF Downloads:
| *These instructions as PDF | |
| *Reduced plans of the front and back and of the base and sides, with all measurements. Print these out for reference even if you also print out the full-sized plans. | |
| *A4 overlapping sheets (12 for front and back, 8 for base and sides) to be assembled into full-sized plans for the two parts. Don’t print these out until you’ve decided on your strategy (next section). |
Strategy:
You could either:
| A. Scale up from the reduced plans directly on to cardboard. This should only be attempted if your drawing skills and equipment are of a reasonable standard, |
| B. Print the 20 sheets and stick them together as described below so they can be laid on the cardboard and the corners and other features marked using pins (on a similar basis to dress-making). |
FRONT AND BACK
| The photograph shows the completed front and back unit. Lay the chosen piece of cardboard flat, with the side to be visible (normally the one without Traidcraft and other labels!) uppermost and inspect where the existing folds are. You may be able to incorporate one or more into required folds e.g. for the top, but it’s much more important not to have a fold going through tabs or the barrier cutouts. The figure shows the folds that happened to be in the piece I used. You’ll be shown how to reinforce unused folds. |
 | 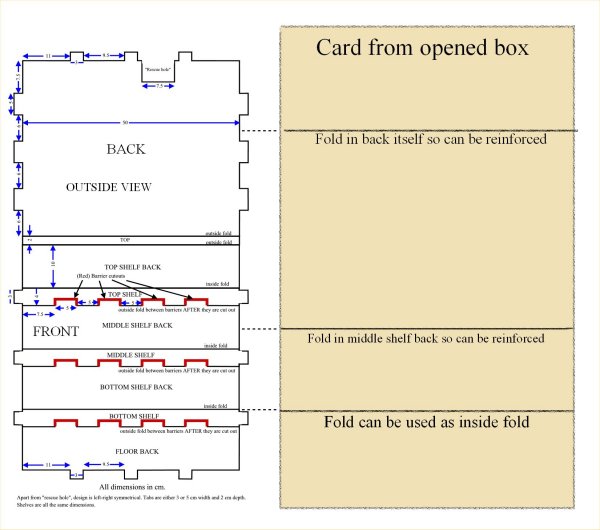 |
Strategy A: If you intend to draw out the plans directly on to the cardboard, do so now. Note where fold lines are to be on the visible (outside) face i.e. “inside folds” and where on the invisible face i.e. “outside folds”. Don’t draw fold lines below the barriers, only in between them. It’s probably easier later if you use continuous lines for cuts and dashed for folds.
Strategy B: Instructions follow for use of the printed sheets:
| Print out the 12 front and back sheets, but: Important note: Set up the Adobe Reader print dialogue by clicking on the 'Size' button, selecting 'Actual size' (i.e. not 'Fit' or 'Shrink') and Orientation 'Auto portrait/landscape'. You might want to print out one page to check the sizes come out exactly. Trim 8 mm from the top edge of all except sheets 1 and 2, and the left edge of all even-numbered sheets. This is because most printers won’t print right to the edge. |
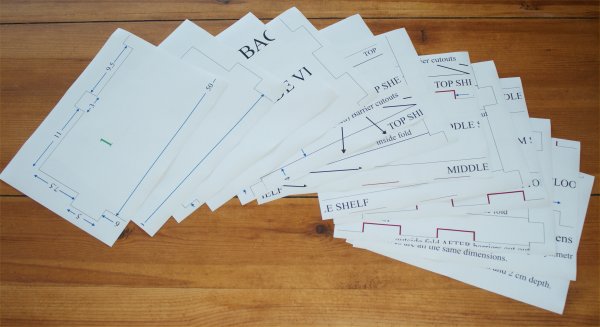 |  |
| Assemble the sheets into 6 rows of 2 as follows: Take sheets 1 and 2 and lay them side by side with 2 overlapping 1 as shown. Position them carefully so the central top tab is continuous and the sides (ignoring tabs) are exactly 50 cm apart all the way down. When correctly placed, hold with a small piece of sticky or masking tape where they join at the top. | 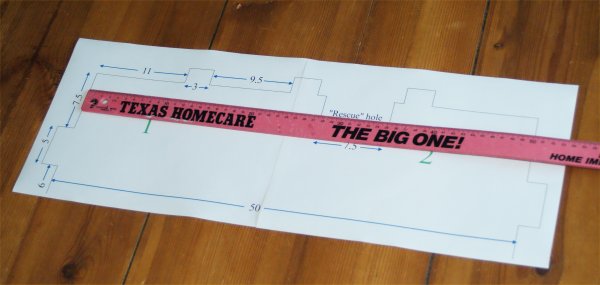 | |
| Add sheets 3 and 4 in a similar way, checking this time that as well as maintaining the 50 cm width, the 6 cm gap between side tabs is exact. Ensuring sheets 1 and 2 have not shifted, tape at the joins as before. Continue down the sheets, checking and taping as you go. You may want to add extra tape on the back to ensure the whole plan can be picked up without falling apart. | 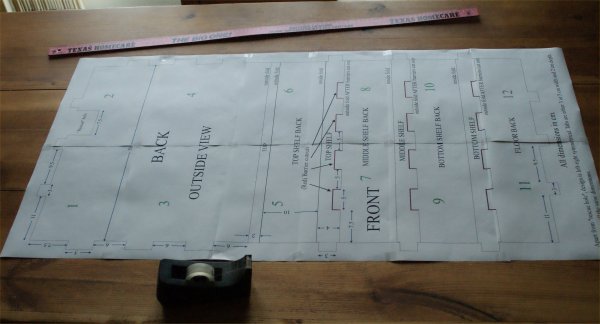 | |
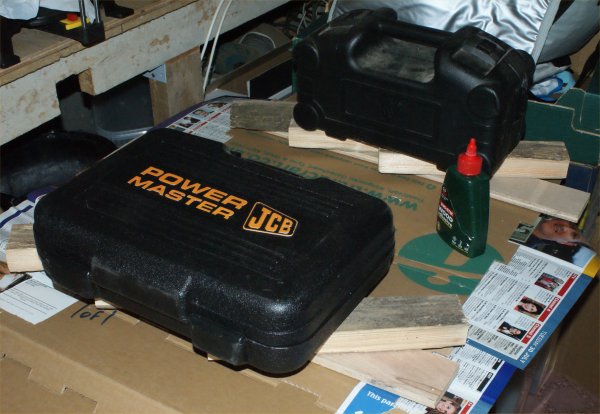
| When the full plan is complete, lay it on the cardboard, ensuring existing folds are positioned correctly i.e. not under tabs or the barrier cutouts and only if possible where folds are needed. Attach the plans to the cardboard with a few pieces of tape. Place plans and cardboard over a flat surface already covered in something thick to protect it – old copies of Radio Times are ideal! |  | |
| Insert drawing pins into every corner and join. You need insert only into the top card layer in most cases, but go right through for “outside folds”, as these are to be marked on the back. If you run out of pins, simply re-use ones used already, as they’ve served their purpose, but ensure enough are left in to keep paper and cardboard firmly positioned. When finished, remove the pins and paper and inspect the card for omissions. Check in particular that the outside fold marker holes have gone right through. |  | |
| “Join the dots”, using felt pen rather than biro so as not to damage the cardboard. It’s probably easier later if you use continuous lines for cuts (1st photo), along with dashed lines on the front of the card for inside folds (2nd photo) and on the back for outside (3rd photo). | 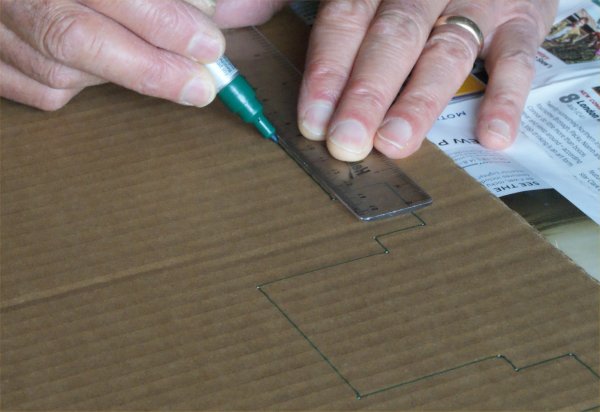 | 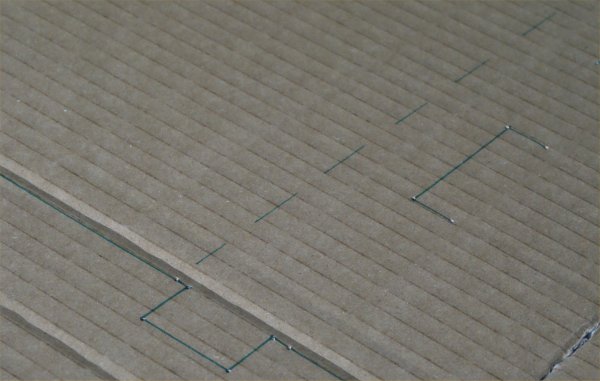 | 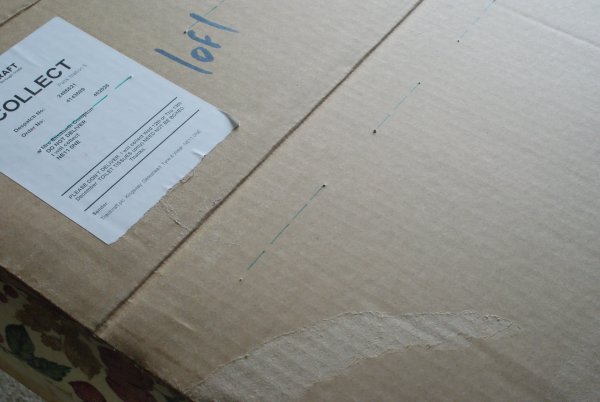 |
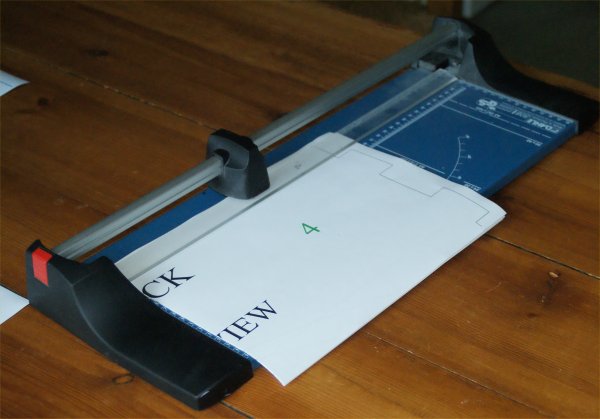
| Now cut along the continuous lines. Sharp scissors will work, though they tend to roughen up inside corners: a craft or modelling knife is best (1st photo), with a scalpel or small pen-knife for short lengths e.g. the barriers (2nd photo). Cut near to the edge of a table or board so one side of the cardboard is supported (3rd photo). Keep all offcuts at this point – you might need some of them! | 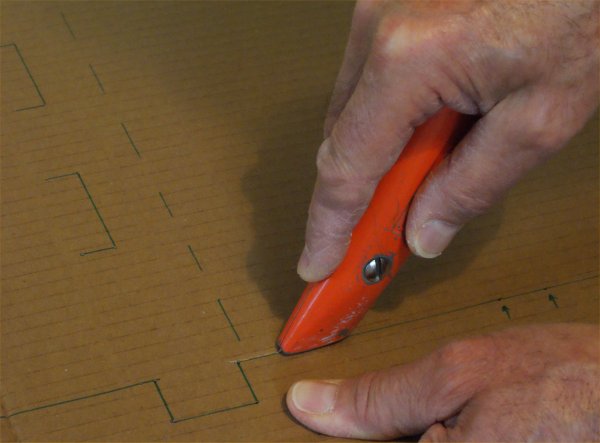 | 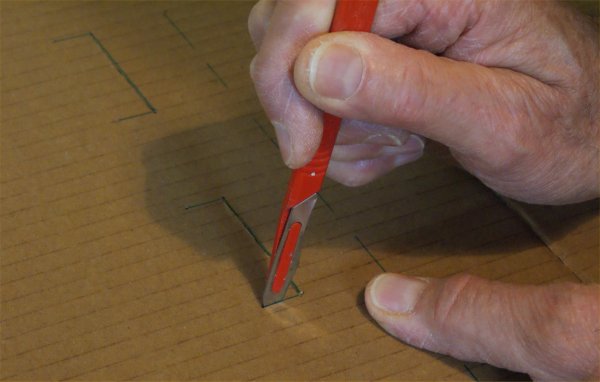 | 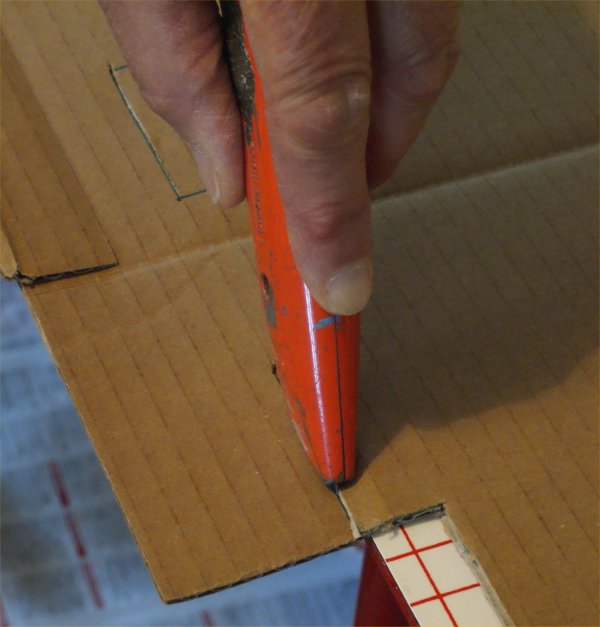 |
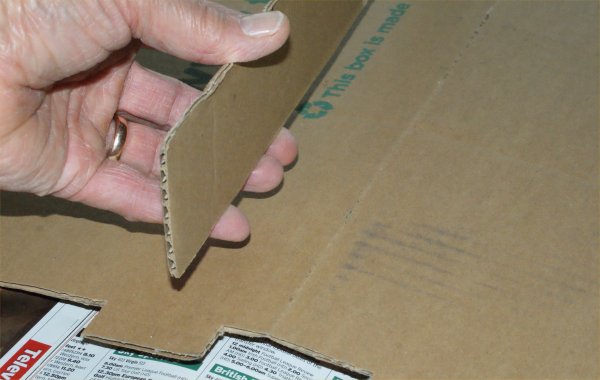
| You should now have the final flat shape of the front and back, with the barriers cut out, though still flush with the rest. Now score along the inside of each fold, using e.g. a blunt tea-knife – bruise the card surface, don’t penetrate it. If you’ve not done this before, practise on an off-cut: 1st photo shows scoring, 2nd the groove made, 3rd the direction of folding. Don’t be tempted to score on the outside of a fold, as it might tear when folded and doesn’t make such a clean right angle. | 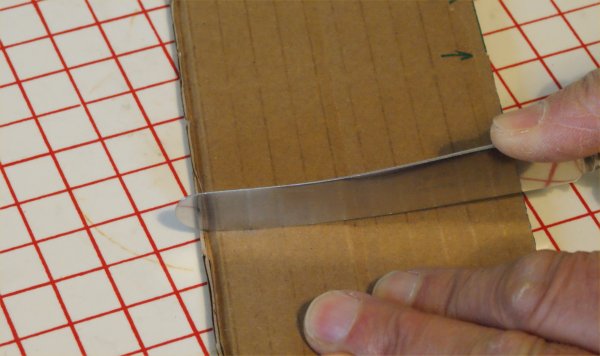 | 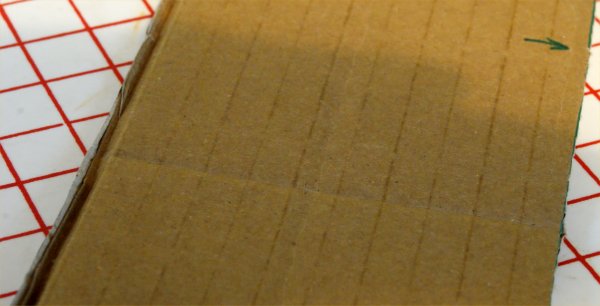 | 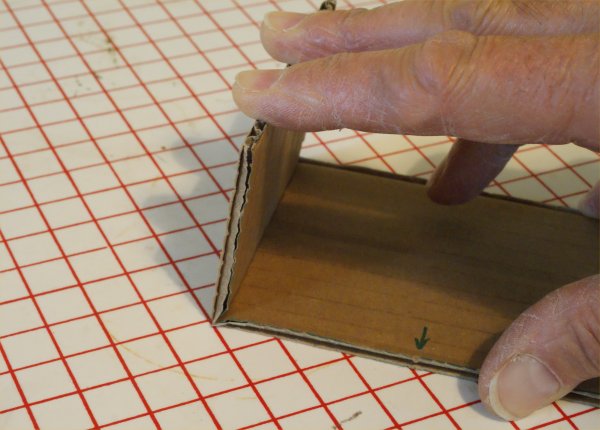 |
| Take particular care with the barriers, which are scored in between on the reverse side and should now stand up when the card is folded. (The card has been turned over between the two photos.) | 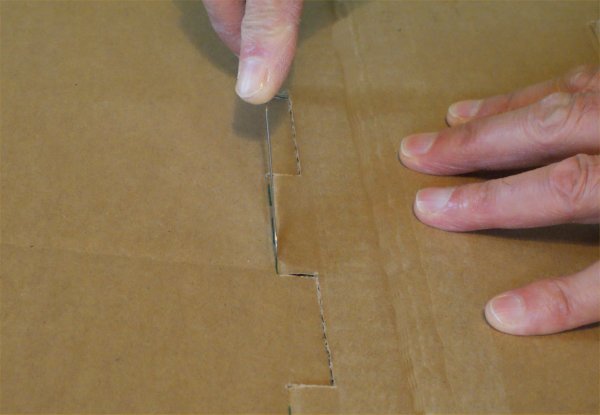 | 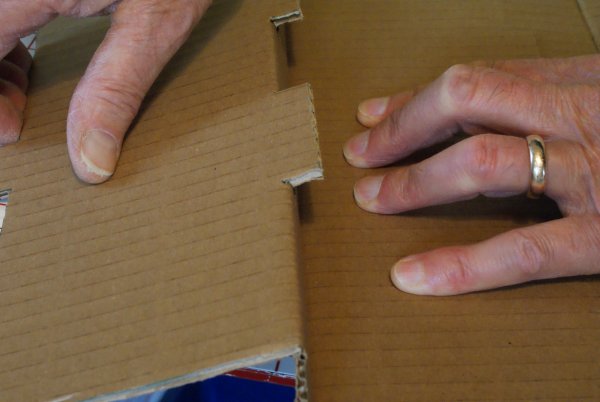 |
| The cardboard can now be folded into the approximate final shape for the front and back (see photo at the start of the FRONT & BACK section). If there are any unwanted folds, usually from the original box configuration, deal with each by cutting a piece of cardboard 3 – 4 cm wide and the length of the fold. Flatten out the front and back again and place on a hard surface with the inner face uppermost this time. Glue the strip on to the fold and apply pressure with pieces of wood and any improvised weights to hand. Leave for the required length of time without disturbance. |
 |  |  |
BASE AND SIDES
| The procedure for the base and sides is exactly the same in principle as for the front and back. Again note carefully which folds are inside and which outside. If wood is to be used for the tilting support rather than the integral square cardboard tube (see Introduction), cut off the long strips at the front. The only different features of the base and sides are the slots for the tabs in the front and back. These can be cut with a knife or scalpel but care is needed with those running along the corrugations, which can easily extend too far. The slots need not be too neat and smooth – they will grip the tabs better if they are a bit rough. | 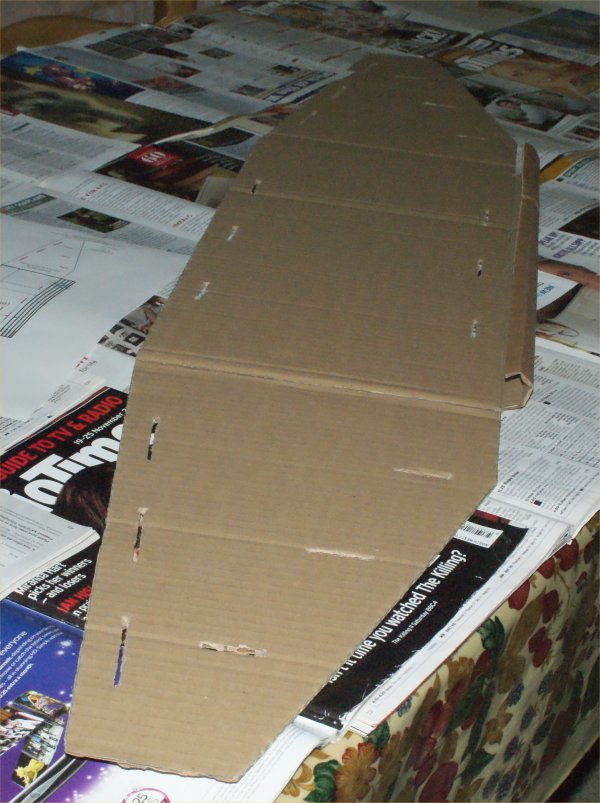 |
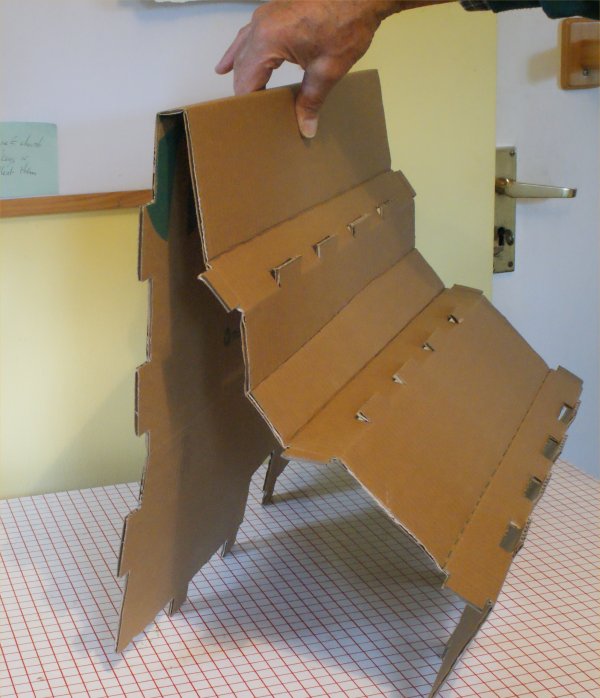
| When the unit is complete, the sides will fold up readily, but the front support (if retained – see the note in the introduction) needs more careful treatment: | 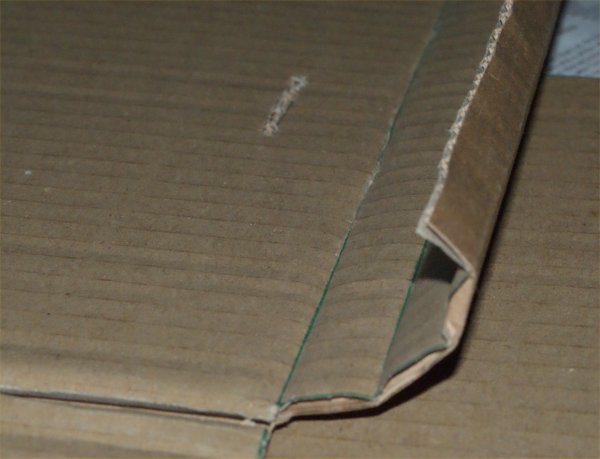 | 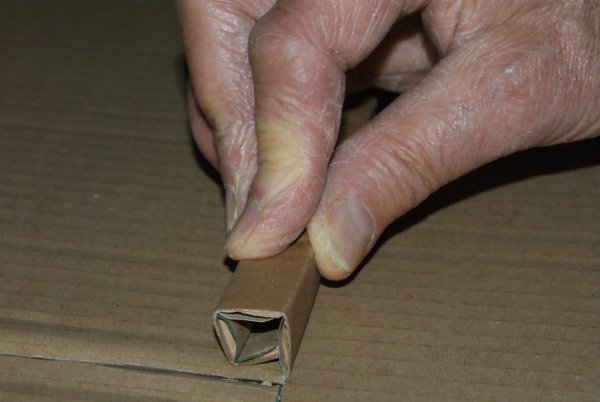 |
FINAL ASSEMBLY
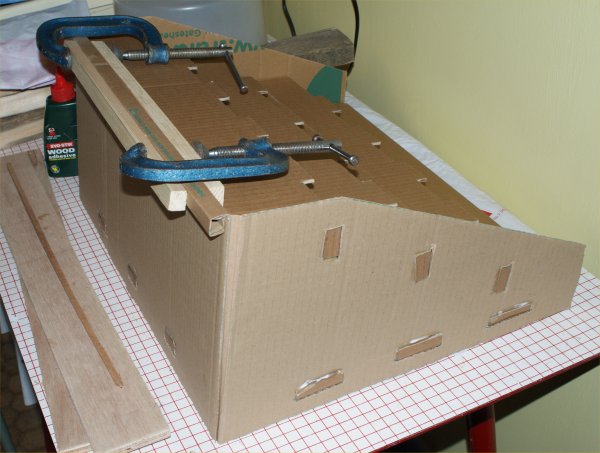
| Fit the whole stand together without gluing, to check whether any slots need enlarging. Make the front support (if retained) flat again at this stage. The photos show the exposed side and base tabs. | 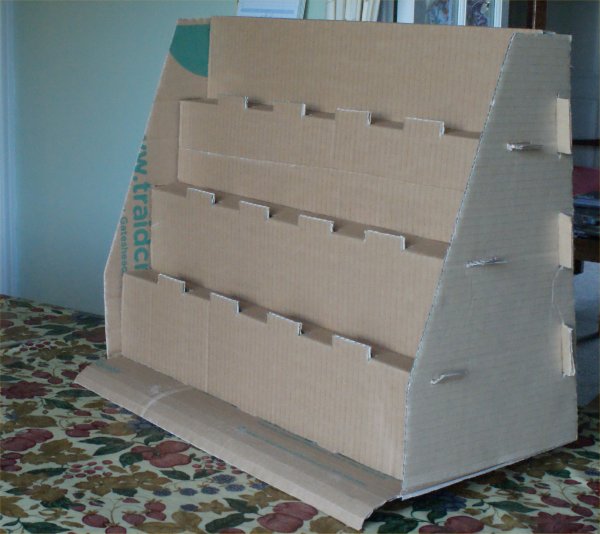 | 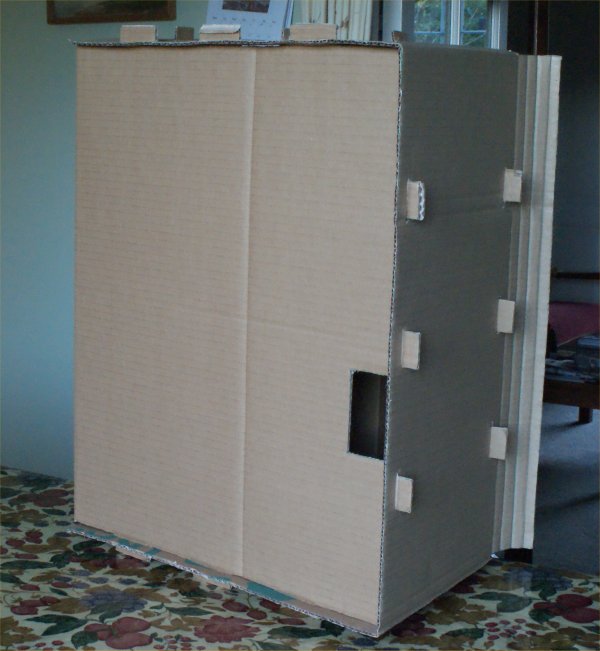 |
The gluing takes place in two main stages:
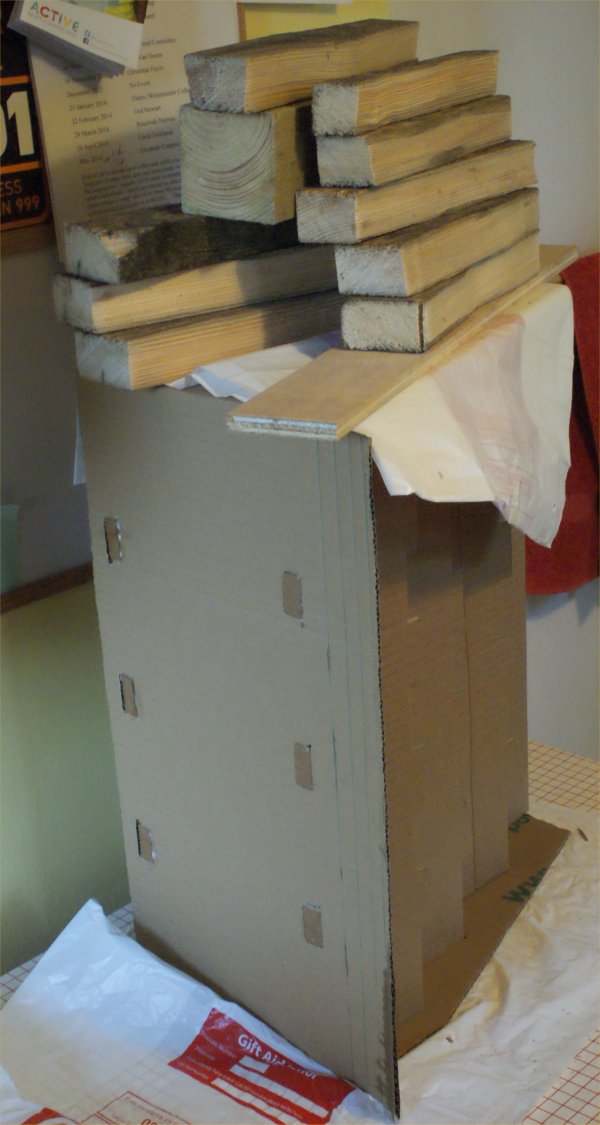
| First, the front and back are fitted to the base only. Push the tabs through and, while pulling them gently, score where they emerge underneath, close to the base itself, in such a way that the tabs fold away from their nearest edge. Apply glue, fold the tabs flat and stand the unit upright on a sheet of polythene (which any glue squeezed out won’t stick to). Apply wood and/or other weights on the inside, right up against the front and back, so the tabs themselves are compressed, and leave undisturbed for the glue to dry – add an extra 50% to the drying time as the polythene reduces air contact. | 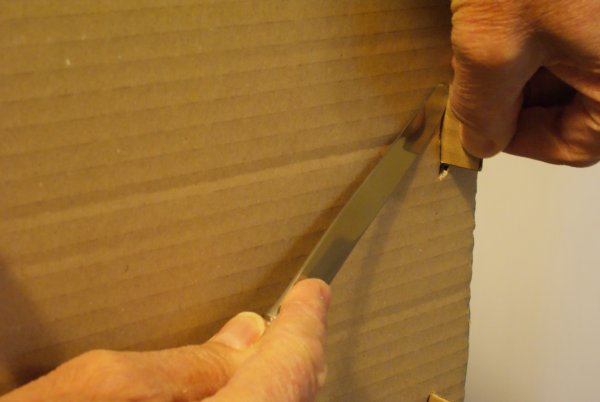 | 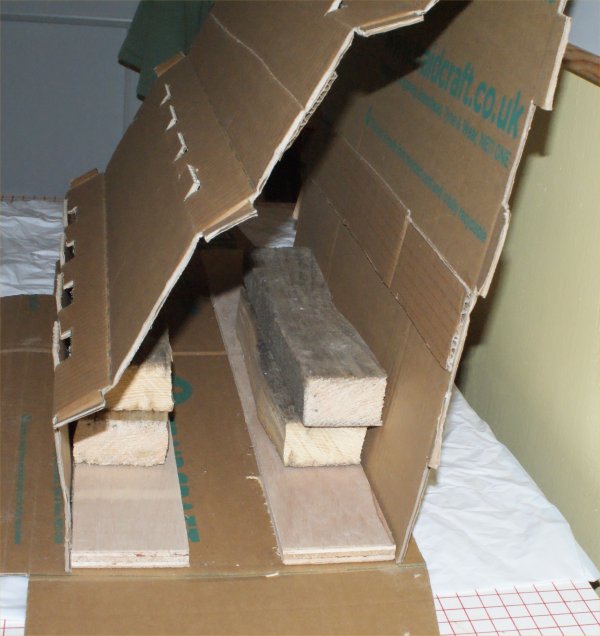 | 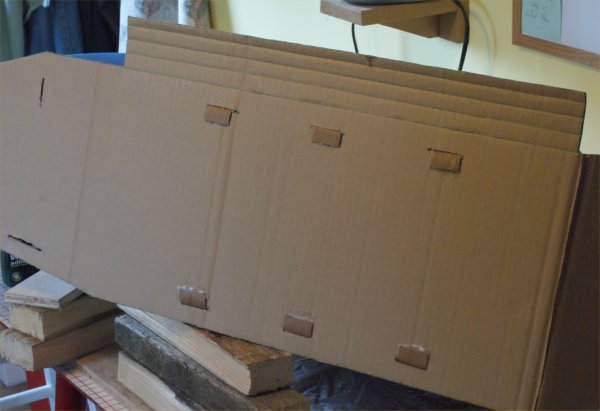 |
| Next, fold the sides up, insert the tabs, score, fold and glue as before. Place the unit on one side on the polythene, lay polythene on top (i.e. on the other side) and add wood and weights sufficient to compress the tabs, though not to threaten to collapse the whole structure! Allow to dry as before. Finally, curl down the front support (if retained), glue and hold in place. I’ve used a couple of small g-clamps and strips of wood, but it could be done by other means e.g. masking tape. |
 |  |
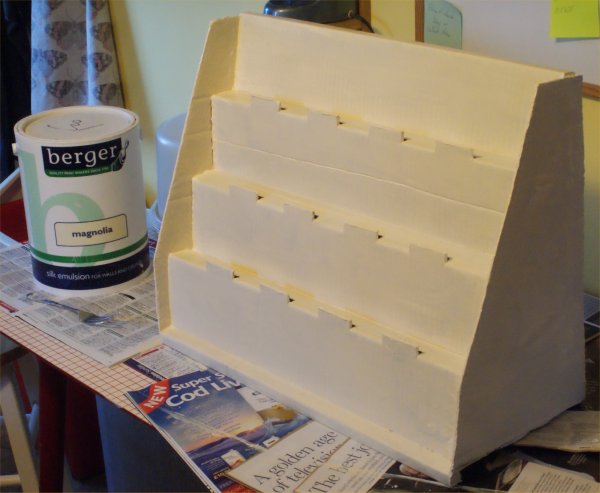
Block off the ends of the support with e.g. small squares of cardboard or filler, to finish the construction. If you’re intending to paint any of it, use primer on the tabs and anywhere else where dried glue might be exposed. Exposed corrugation holes could be pinched closed and glued, or filled with wood filler or even plaster filler, though something slightly flexible will last longer.
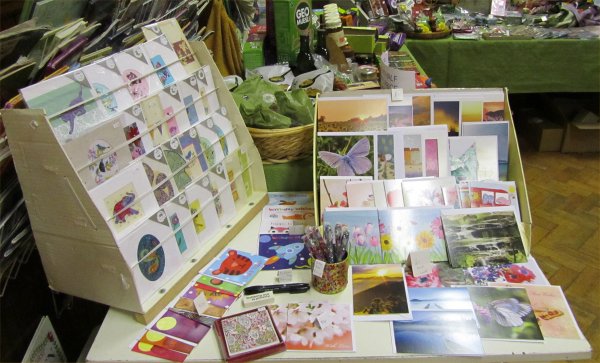
| Finishing off is entirely up to you. I simply sloshed on some magnolia silk emulsion I happened to have in the cupboard, but you could decorate it much more extravagantly, paper the sides to hide the tabs, pink the edges of the sides etc. etc. A retaining strip at the front of each shelf is useful, particularly if the unit might get knocked when in use – I used braided elastic (less politely referred to as knicker elastic), but you might prefer e.g. coloured ribbon. The photos show the one I made and used for the photos and the prototype again. |
 | |
If you wish to comment, ask for advice or whatever, do e-mail me at
 .
.BEST OF LUCK!
Tony Compton